Labels

Showing posts with label savory. Show all posts

Saturday, 12 September 2015

sweet potato cheese straws

Crunchy Munchies......

And perfect tiffin treats...yummy healthy and you can make them in any different types you want..
you can make them cheese flavored, or skip the cheese to make plain crackers, you can also make them multi grain(more flavor + much healthier).
You can make them in any shape you want and your kids will surely love them, as all kids prefer crunchy and snappy snacks to munch on.
I changed the orignal recipe a little to make it a bit healthier

Ingredients:
3/4 cup whole wheat flour
3/4 cup mashed sweet potato
3/4 cup cheddar cheese
2 tablespoons butter, at room temperature
1/2 teaspoon salt
2 tablespoons whole milk
Instructions

Method: 
Preheat oven to 350°F(170 degrees Celsius).
In large mixing bowl, combine flour, sweet potato, parmesan, cheddar, butter and salt. Mix with beater until mixture becomes sandy. Add milk and knead into a ball.
On floured surface, roll dough into a ¼-inch thick rectangle.Cut into ¼-inch wide strips or you can use cookie cutters to get different shapes. Gently transfer strips to a parchment paper lined cookie sheet.
Bake until ends are slightly brown, about 10 to 112 minutes. Remove from oven,cool.


Big Smiles in the tiffin
Classic straws
                                 

Little hearts

I tried also made sweet potato ragi crackers with this recipe which was also a huge success.  

1 cup whole wheat flour
1/2 cup ragi/nachni flour (or any flour blend you chose to use)
2 tbsp toasted flaxseed (ground or whole)
2 teaspoons baking powder
1/2 teaspoon salt
3 tablespoons butter
1 cup of sweet potato puree (two small boiled sweet potatoes mashed with 1/4 cup milk)
1 teaspoon sugar
1 tsp garlic powder (optional)
2 tsp mixed herbs (optional)
pepper or paprika (optional)
sesame seed to top
kalonji seeds to top

Method:
preheat oven to 170 degrees.
Sift flour, baking powder, sugar and salt together into a large bowl. place sifted flour mixture, butter, flax seeds and herbs and spices in the bowl of your food processor and pulse for a few times, until the mixture resembles bread crumbs. add the sweet potato puree and pulse a few more times. the dough should come together, if it feels to dry you can add a little milk. but be careful not to make it too soft.
bring the dough together by hand and divide into 4 - 5 large portions.
roll each portion as thin as you can, an easy tip for rolling thin portions is to roll them in between wax paper or cling wrap.if you want to top them with sesame seeds, sprinkle sesame and kalonji seeds on top and roll once with your rolling pin to seal the seeds. Cut into any desired shape and bake in the preheated oven for 10 minutes.

healthy smiles


Wednesday, 29 July 2015

Masala herb cookies


Savoury trinkets....

every indian loves kharis, and butters, and toasts...what if you get smething similar, but with added flavour, and a bit healthier..everyone is gonna say WHY NOT...
I loved the flavor of these cookies and the versatality, the herbs can easlisy be changed to whatever herbs you want to add and you can add or reduce, any herb that you don't have a liking for. The final cookies have a very subtly sweet n savory flavour that goes really well with a steaming cup of tea. It also make a nice snack to add to your little one's tiffin.
I adapted this recipe to my liking.


Ingredients:

3/4 cup all-purpose flour
1 cup whole wheat
2 tablespoons fine white or brown rice flour (optional)
1 teaspoon baking powder
1/4 teaspoon baking soda
1/2 teaspoon salt (or according to your taste)
1/2 cup chilled butter, cut into small pieces
3/4 tsp dried ginger powder (optional)
1-1/2 teaspoon whole peppercorn, crushed coarsely
1-1/2 teaspoon cumin seeds, toasted and crushed coarsely
1 tablespoon granulated sugar
1-1/2 tablespoons finely chopped curry leaves
1 tablespoon each finely chopped fresh cilantro,mint and dill leaves
3 to 4 tablespoons cold yogurt

2 -3 tbsp toasted sesame seeds or flaxseeds or both.
A little oil to brush the tops of the biscuits/ cookies

Instructions
Put both flours, salt, baking powder and baking soda into the bowl of a food processor and add the pieces of chilled butter. Pulse until the mixture takes on the texture of breadcrumbs.
Now add the crushed peppercorn and cumin, sugar, the chopped curry leaves and coriander leaves. Pulse a couple of times to mix well.
Then add 2 tablespoons of yogurt and pulse again. Add one more tbsp of yogurt (or two, as much as needed), and pulse again until the dough just comes together and clumps together. You want a moist dough, not a wet one – somewhat like pie dough.
Do not over process or knead. The dough should be just moist enough for you to use your hands and bring everything together to shape into a ball. Flatten it into a disc and cover the dough with plastic wrap and let it rest in the refrigerator for at least hour. You can also leave it overnight (up to about 24 hours) and work on it the next day.
Pre-heat your oven to moderate 170 degrees and line your baking trays with parchment or grease them with oil.
Lightly dust your working surface and roll out the dough to 1/8”(3 mm) thickness, not more or your biscuits/ cookies will not be crisp. If using Sesame seeds, sprinkle it uniformly over the dough and use your rolling pin, very lightly, to press them in.Using cutters of your choice (about 2-1/4 inch in size), cut out biscuits/ cookies and place them on lightly greased baking trays. Brush a very thin coat of oil over them. This will help them brown while baking. Bake them in a preheated moderate oven for about 20 to 25 minutes or till they’re done and golden brown on the top. Remember the baking time will depend on the thickness and shape of your biscuits/ cookies. Let them cool on the trays for about 5 minutes and then cool them on racks. Once they’re completely cool, they should be a bit crunchy and not chewy.


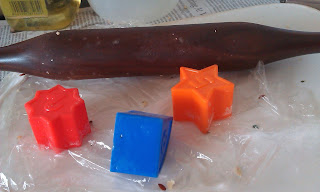
I improvised and used my son's shape
 toys as cookie cutters to get all kinds of shapes
perfect for the tiffin !!


round one's to have with tea

Thursday, 25 June 2015

Chapati Crisps

Say no to chips no more....

trying to teach your toddler to eat healthy can be quite a challenge..especially in this day and age when every unhealthy snack is packaged especially to attract kids..So it gives me great pleasure when my little one especially requests for these..
the simplest to make and great for the tiffin too...Also a great way to utilize left over rotis..


Ingredients:
2  - 3 rotis cut into triangles or any desired shape..
2 - 3 tsp of oil
a pinch of salt ( try to add as less as possible, so that kids have an early habit of less salt)
oregano
red chilli powder or black pepper powder
garlic powder

Method:
preheat the oven to 160 degrees, grease a flat tray or cookie sheet 1 tsp of oil (you can preheat the tray too for better results)..
mix 2 tsp of oil and all the spices with the cut roti in a bowl. (you can add your own choice of spices).
dump it all in the cookie tray and bake for 10 - 12 minutes..after removing from the oven if some pieces are not yet crisp, keep it in the oven for 3 -4 more minutes (usually doesn't take more than that).
cool completely and serve to ur little one...you could also serve it with a dip to older kids..

Thursday, 1 May 2014

Garlic Sauce

Mediterranean marvels...

If you have stayed in the gulf, or even visited any of the gulf countries, most probably you have tasted this wonderful condiment cum dipping sauce that is often served with most Arabic, or Lebanese dishes.
Its somewhat akin to a garlic mayonnaise, but it uses only egg whites and not whole eggs. (also for some reason i have mastered this recipe but have failed, each time i have tried making mayonnaise).
I found this recipe, with video on dedemed (the video is really important, coz i have found that even one ingredient put in the wrong order can spoil this recipe)


Ingredients:
4-6 cloves garlic, minced
1/4 tsp salt
1 cup canola oil
1/4 cup lemon juice
1 or 2 cold egg whites


Method:

In a food processor add minced garlic, begin processor and slowly add oil and lemon juice alternating them. after it turns whitish add one to two cold egg whites while the processor is blending until you reach mayonnaise consistency. Add the rest of the oil and lemon juice until gone, scrape down sides intermittently. add the salt and give it a few pulses in the end.
Serve with chicken or meat and cover and refrigerate remainder. Refrigerate for up to 1 week in closed container.


To be enjoyed with various fried or grilled meats, fries or even carrot sticks...why not.

Thursday, 3 April 2014

chips

Healthy Munchin...

This is not much of a recipe, more of an Idea, but a really good one. you can make baked chips with whatever you want, you can make your classic all time favorite potato chips, the indian favorite banana chips, or healthier versions like sweet potato or tapioca chips.
believe me, your kids will love you, and you will be the cool mom, who makes them Chips...

The recipe that i initially found was for sweet potato chips, and believe me i found them better than potato chips, especially for kids, they are richer in vitamins than the regular potato and because of the slightly sweet taste in them, you actually require no salt or seasoning...(not joking)


Sweet potato crisps

Ingredients:
2 Sweet potatoes,Scrubbed and sliced into small strips with a potato peeler.
Few sprays of olive oil

Method:

Turn the oven to 200°C and line a baking tray with foil.
Pat the sweet potato slices dry with some kitchen paper and arrange on the tray.
Spray with the spray oil and lightly stir to coat all sides.
Spread them out again so they are mainly in contact with the foil.
Bake for 8 - 10  minutes until golden brown, turning once half way through. Keep an eye on them towards the end as they can quickly turn from done to burnt.


You might have to experiment with the temperatures and timings depending on you oven and the type of hips you are making, but once you have perfected that, there is not much effort required for making these


Baked banana chips

Tuesday, 7 January 2014

Multigrain crackers

Crackery goodness

I know I know, its been a long long time since my last blog, what with wedding season in full swing plus a short trip only to return home, not in the pink of health...just couldn't find the time to complete this blog earlier...hopefully will try to be quicker from now on..
I love baking...I really love pulling out freshly baked warm cookies and cakes from my oven. But once in a while i just don't want to make something sweet. I've always loved crackers, chips, saltines and the likes...so when i finally found this recipe here, i just couldn't wait to try it...the thing i've felt with similar recipes is that usually it takes longer to get them crisp than the said time (or you have to keep them at a lower temperature for a long time to dry out). The difference with this recipe was the semolina flour. and I found that It actually got them crispy and crunchy much faster. also you can try it with all sorts of flour combinations.
these are also a healthier option for growing kids...especially when they are at the age when they love chips n other dry snacks that they can eat on their own.


Ingredients:
3/4 cups semolina flour
1/4 cups whole wheat flour
1/2 cup ragi(nachni) flour
1 teaspoon salt
1/2 cup warm water
1/4 cup extra virgin olive oil (or vegetable oil)
Coarsely ground flaxseeds

Method:
Whisk together the flours and salt. Add the water and olive oil. Using a mixer with a dough hook attachment mix the dough at medium speed for about 5 - 7 minutes. Alternately, feel free to mix and then knead by hand on a floured counter-top. The dough should be just a bit tacky - not too dry, not too sticky to work with. If you need to add a bit more water (or flour) do so.
When you are done mixing, shape the dough into a large ball. Now cut into twelve equal-sized pieces. Gently rub each piece with a bit of olive oil, shape into a small ball and place on a plate. Cover with a clean dishtowel or plastic wrap and let rest at room temperature for 30 - 60 minutes.
While the dough is resting, preheat your oven to 200 degrees C. Insert a pizza stone if you have one.
When the dough is done resting, flatten one dough ball. Using a rolling pin or a pasta machine, shape into a flat strip of dough- I didn't have a pasta machine so i rolled it by hand, but it becomes easier to roll between two sheets of cling wrap, especially if you are using a combination of different flours, you can roll it as thin as you want without the dough sticking or braking(so crispier crackers, yay). Pull the dough out a bit thinner by hand (the way you might pull pizza dough). You can also cut the dough into whatever shape you like at this point. Set dough on a floured (or cornmeal dusted) baking sheet, poke each cracker with the tines of a fork to prevent puffing, add any extra toppings, and slide into the oven (onto the pizza stone). Repeat the process for the remaining dough balls, baking in small batches. If you don't have a pizza stone, bake crackers a few at a time on baking sheets. Bake until deeply golden, and let cool before eating - you will get more crackery snap.

Makes a dozen extra large crackers.

I tried the same recipe to make cornmeal crackers, this time I mixed some spices into the dough instead of the topping. also since cornmeal is pretty course, i switched it with the semolina, but later i felt that it took longer to crisp than the ragi crackers, but these were definitely better in taste.
corn meal cracker - In cute little fish shapes
YES!!! they look so professional b'coz of the shapes, and I got to use my new cookie cutters. your kids will love these

Ingredients:
1/2 cup cornmeal
1/2 cup whole wheat flour
3 - 4 Tbsp grated cheddar cheese
1 Tbsp sesame seeds
1/2 tsp salt
1/2 tsp oregano
3 tbsp olive oil
1/3 cup boiling water


these are so great you will want to try out all kinds of different combinations...

Wednesday, 28 August 2013

Puff Pastry

Demystifying the Puff

I love puff Pastry...there is no other way to put it.
But what happens when something that was readily available to you, is suddenly not around. For many years after moving to mumbai from the gulf I satisfied myself with hogging on my mom's puffs when I used to go back to Abu dhabi for a break. B'coz in India you don't get puff pastry sheets( sob sob).
then one day when I saw rachel allen on tv, making puff pastry from scratch, i thought maybe I can do it too.
and whats more, on further surfing the net I found many easier versions, called rough puff, which were more to my liking than the classic version. (anything simpler is better ). the basic recipe is pretty simple, its just the rolling and turning and chilling that has to be taken care of.
I took the basic recipe from this video and then made some further changes, referring to some other sites.

Puff pastry palmiers

Chicken Puffs, Yumm!!!
Ingredients:
150 g whole wheat flour
150 g all purpose flour
250 g butter
100 – 150 ml chilled water
Salt
Juice of half a lemon

Method:

most important point while making puff pastry, especially rough puff pastry.
your flour, your water, and your butter, put everything in the freezer for 10 - 15 minutes.
cut the butter into large chunks and keep in the freezer. squeeze half a lemon in the water and keep aside, make sure everything is handy and ready before you start mixing the flour.
blitz the flours, and salt in the jar of your food processor for 3 seconds.
Add half the butter and blitz for 5 seconds, add the rest of the butter and blitz for another 5 seconds. you should be able to see smaller chunks of the butter in the flour, the flour has to be courser than breadcrumbs.
slowly add half the chilled water and blitz again for 3 -4 seconds. add the rest of the water and blitz again, if you feel it will become too wet, you can reserve some of the water (use your judgement). the flour will not form into a single ball, but will start clumping together.
at this point, you have to empty the dough onto a nicely floured surface or a wax paper, for easy handling.
Shape the messy, shaggy dough into a rough rectangle and roll it out until it's 1/2 inch thick. Resist the temptation to overwater or overwork the dough; it will eventually hold together.

Use a pastry scraper or the edges of your wax paper if rollling on wax paper to fold the dough in thirds like a business letter. Don't worry if it folds in pieces. Turn the package of dough 90 degrees so the folds run vertically. Square off the edges of the dough as you work. chill the dough for 20 minutes, at this point if your kitchen is really warm and if you feel the butter is starting to melt.
Roll the dough into a rectangle that's 1/2 inch thick, always rolling from open end to open end. Continue rolling, folding, and turning until the dough looks smooth. By four or five "turns," the dough should hang together well. remember to chill for at least 20 minutes between each turn

For even more layers, fold the smooth dough up like a book. To do this, fold the two shorter sides into the center and then fold the dough like a book. Brush off excess flour as you fold. Wrap the dough and chill it for half an hour before giving it two final turns. At this point, you can then use the dough, though another short rest will make rolling and shaping easier.
for the final rolling you have to roll it a little thinner. and shap as you like, you can also just cup it into squares and freeze the sheets for later use.

for Baking - bake for 15 - 20 minutes in a well preheated oven at 200 degrees Celsius.

100% whole wheat puff. Didn't puff

After My puff turned out a success i tried to use the same technique with an all whole wheat flour dough. they puffed very little and the layers didn't separate

Partly Whole wheat puffs, Success !!!


Third try - 50 % whole wheat and 50% all purpose flour -  and we have a Winner