Labels

Thursday, 28 January 2016

Chocolate and White Chocolate Mirror Glaze

Working around fondant......

Decorated cakes and themed cakes are really easy to plan and make with fondant..because its basically like play dough..and you can make whatever you want with it... it also gives your cakes a lot of stability, especially if you want to carry your cake someplace else..where in it wont have refrigeration while travelling...whipped cream cake can really melt in such conditions in the heat that we experience over here...
But what do you do if you don't like the taste of fondant..or if fondant is not easily available..In My case i really don't like the taste of fondant, i wouldn't mind a few tiny fondant roses on top if my cake..that too would be put aside while eating...so covering the whole cake with fondant is pointless..as no one in my house or near and dears like fondant...a cake should have just the rite amount of sweetness and it should be fresh and soft...covering it with chewy fondant in my opinion is waste of a good cake...
so anyways the question arises as to what can be used to cover the cake and give it a smooth appearance to make successful themed cakes....and the answer is mirror glaze..
its easy, its cheap, and its tasty, and your cake looks great, and your cake gets stability.

for smaller floral decorations, i found that you can make flowers our of marshmallows which i tried suceesfully and gummy candy too..which is on my next to try list(the list btw is never ending)

  
chocolate mirror glaze with fondant roses and marshmallow flowers
I finally found my answer in chocolate mirror glaze - it like the best thing possible, tastes like chocolate sauce and it actually gives stability to your cake, similar to fondant, and your cake decorations don't spoil on touch (as it would in case of buttercream or whipped cream).
And you can make either a chocolate or white chocolate version depending on the theme of your cake

3D car cake with coloured white chocolate glaze..

I followed the recipe more or less, but reduced the sugar quite a bit as that is my personal preference


Ingredients:-

10 g powdered gelatin ( about two tsp)
150 g sugar (100 g for white chocolate glaze)
100 g water
65 g cocoa powder ( 50 g milk powder - optional - for white chocolate glaze )
65 g fresh cream or heavy cream (75 g for white chocolate glaze)
50 g dark chocolate / white chocolate

Method:- 


In a medium-sized bowl, bloom the gelatin in plenty of cold water. Let the gelatin bloom for at least 10 minutes before using.
 Bring the sugar, water, cocoa powder, and Heavy cream to a boil while stirring constantly.
When it comes to a boil, stir in the chocolate and mix until dissolved.
Squeeze the excess water off the bloomed gelatin, add it to the pot, and stir until dissolved.
Pass the mixture through a fine-mesh sieve, or use an immersion blender to blend the mixture until it is smooth and glossy ( if your mixture already looks smmoth and glossy the you can skip this step)
Transfer the chocolate glaze mixture to a jar, and cover the surface of the chocolate glaze with plastic wrap.
Chill in the refrigerator overnight before using.
When you’re to use it, warm the chocolate glaze to the temperature between 44°(microwaving it for short bursts at medium high , gets the desired result ) before using it. If you do get a a lot of air bubbles in the glaze, strain it through a fine mesh strainer before using, otherwise the tiny bubbles will show on the finished cake.
NOTE It is always necessary to make more glaze than needed, because the entire cake needs to be covered with glaze. As the glaze is poured over the cake, some will pour off, resulting in an even coat. You can rescue some of the dripped off glaze to reuse later and pass it through a fine-mesh sieve.
this glaze can be stored in the refrigerator for more than a month, and can be reused.

My little one's 3rd birthday cake !!!

personally i like the chocolate glaze better than the white chocolate glaze..but this could be because, i'm not a big fan of white chocolate, plus the white chocolate available was not of the best quality...but stability wise they both worked great.....

Coffee mousse cake with marbled glaze for the anniversary !!

Saturday, 12 September 2015

sweet potato cheese straws

Crunchy Munchies......

And perfect tiffin treats...yummy healthy and you can make them in any different types you want..
you can make them cheese flavored, or skip the cheese to make plain crackers, you can also make them multi grain(more flavor + much healthier).
You can make them in any shape you want and your kids will surely love them, as all kids prefer crunchy and snappy snacks to munch on.
I changed the orignal recipe a little to make it a bit healthier

Ingredients:
3/4 cup whole wheat flour
3/4 cup mashed sweet potato
3/4 cup cheddar cheese
2 tablespoons butter, at room temperature
1/2 teaspoon salt
2 tablespoons whole milk
Instructions

Method: 
Preheat oven to 350°F(170 degrees Celsius).
In large mixing bowl, combine flour, sweet potato, parmesan, cheddar, butter and salt. Mix with beater until mixture becomes sandy. Add milk and knead into a ball.
On floured surface, roll dough into a ¼-inch thick rectangle.Cut into ¼-inch wide strips or you can use cookie cutters to get different shapes. Gently transfer strips to a parchment paper lined cookie sheet.
Bake until ends are slightly brown, about 10 to 112 minutes. Remove from oven,cool.


Big Smiles in the tiffin
Classic straws
                                 

Little hearts

I tried also made sweet potato ragi crackers with this recipe which was also a huge success.  

1 cup whole wheat flour
1/2 cup ragi/nachni flour (or any flour blend you chose to use)
2 tbsp toasted flaxseed (ground or whole)
2 teaspoons baking powder
1/2 teaspoon salt
3 tablespoons butter
1 cup of sweet potato puree (two small boiled sweet potatoes mashed with 1/4 cup milk)
1 teaspoon sugar
1 tsp garlic powder (optional)
2 tsp mixed herbs (optional)
pepper or paprika (optional)
sesame seed to top
kalonji seeds to top

Method:
preheat oven to 170 degrees.
Sift flour, baking powder, sugar and salt together into a large bowl. place sifted flour mixture, butter, flax seeds and herbs and spices in the bowl of your food processor and pulse for a few times, until the mixture resembles bread crumbs. add the sweet potato puree and pulse a few more times. the dough should come together, if it feels to dry you can add a little milk. but be careful not to make it too soft.
bring the dough together by hand and divide into 4 - 5 large portions.
roll each portion as thin as you can, an easy tip for rolling thin portions is to roll them in between wax paper or cling wrap.if you want to top them with sesame seeds, sprinkle sesame and kalonji seeds on top and roll once with your rolling pin to seal the seeds. Cut into any desired shape and bake in the preheated oven for 10 minutes.

healthy smiles


Wednesday, 29 July 2015

Masala herb cookies


Savoury trinkets....

every indian loves kharis, and butters, and toasts...what if you get smething similar, but with added flavour, and a bit healthier..everyone is gonna say WHY NOT...
I loved the flavor of these cookies and the versatality, the herbs can easlisy be changed to whatever herbs you want to add and you can add or reduce, any herb that you don't have a liking for. The final cookies have a very subtly sweet n savory flavour that goes really well with a steaming cup of tea. It also make a nice snack to add to your little one's tiffin.
I adapted this recipe to my liking.


Ingredients:

3/4 cup all-purpose flour
1 cup whole wheat
2 tablespoons fine white or brown rice flour (optional)
1 teaspoon baking powder
1/4 teaspoon baking soda
1/2 teaspoon salt (or according to your taste)
1/2 cup chilled butter, cut into small pieces
3/4 tsp dried ginger powder (optional)
1-1/2 teaspoon whole peppercorn, crushed coarsely
1-1/2 teaspoon cumin seeds, toasted and crushed coarsely
1 tablespoon granulated sugar
1-1/2 tablespoons finely chopped curry leaves
1 tablespoon each finely chopped fresh cilantro,mint and dill leaves
3 to 4 tablespoons cold yogurt

2 -3 tbsp toasted sesame seeds or flaxseeds or both.
A little oil to brush the tops of the biscuits/ cookies

Instructions
Put both flours, salt, baking powder and baking soda into the bowl of a food processor and add the pieces of chilled butter. Pulse until the mixture takes on the texture of breadcrumbs.
Now add the crushed peppercorn and cumin, sugar, the chopped curry leaves and coriander leaves. Pulse a couple of times to mix well.
Then add 2 tablespoons of yogurt and pulse again. Add one more tbsp of yogurt (or two, as much as needed), and pulse again until the dough just comes together and clumps together. You want a moist dough, not a wet one – somewhat like pie dough.
Do not over process or knead. The dough should be just moist enough for you to use your hands and bring everything together to shape into a ball. Flatten it into a disc and cover the dough with plastic wrap and let it rest in the refrigerator for at least hour. You can also leave it overnight (up to about 24 hours) and work on it the next day.
Pre-heat your oven to moderate 170 degrees and line your baking trays with parchment or grease them with oil.
Lightly dust your working surface and roll out the dough to 1/8”(3 mm) thickness, not more or your biscuits/ cookies will not be crisp. If using Sesame seeds, sprinkle it uniformly over the dough and use your rolling pin, very lightly, to press them in.Using cutters of your choice (about 2-1/4 inch in size), cut out biscuits/ cookies and place them on lightly greased baking trays. Brush a very thin coat of oil over them. This will help them brown while baking. Bake them in a preheated moderate oven for about 20 to 25 minutes or till they’re done and golden brown on the top. Remember the baking time will depend on the thickness and shape of your biscuits/ cookies. Let them cool on the trays for about 5 minutes and then cool them on racks. Once they’re completely cool, they should be a bit crunchy and not chewy.


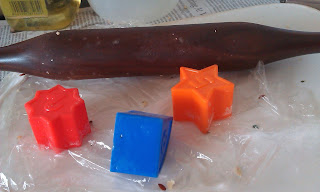
I improvised and used my son's shape
 toys as cookie cutters to get all kinds of shapes
perfect for the tiffin !!


round one's to have with tea

Saturday, 11 July 2015

hazelnut thumprint cookies


Fun Prints...

Thumprint cookies look cute and are yum...they are also very versatile, you can fill them with any filling of your liking.. I especially like the soft crumbly cookie...reminded me of the cookies we used to get in lebanese bakeries....
the recipe is also very very simple and you can have a batch of cookies ready with hardly any fuss.
Its a classic hershey's recipe so you can't go wrong with it...


Ingredients:
chocolate ganache or nutella
1/3 cup Cocoa powder
1/4 teaspoon salt
1 cup chopped hazelnuts (or any other nut)
2 tablespoons milk
1 teaspoon vanilla extract
1 cup all-purpose flour
1 egg
1/2 cup butter or margarine
2/3 cup sugar


Method:
1. Beat butter, sugar, egg yolk, milk and vanilla in medium bowl until fluffy. Stir together flour, cocoa and salt; gradually add to butter mixture, beating until blended. Refrigerate dough at least 1 hour or until firm enough to handle.
2. Heat oven to 350°F. Lightly grease cookie sheet or line with parchment paper. Shape dough into 1-inch balls. With fork, beat egg white slightly. Dip each ball into egg white; roll in nuts. Place on prepared cookie sheet. Press thumb gently in center of each cookie.
3. Bake 10 to 12 minutes or until set.
Remove cookies from cookie sheet to wire rack; cool 5 minutes. Spoon about 1/4 teaspoon ganache into each thumbprint.
Cool completely.
makes about 24 cookies

I tried the same recipe by substituting
 1/3 cup of ground almond and sesame seeds instead of the cocoa powder to make some almond cookies, and added a little bit of almond essence.. and got really nice chewy almond cookies.


Saturday, 27 June 2015

double chocolate banana muffins

Going Bananas....


I love a freshly baked banana bread anytime, but some how whenever i've gone through any recipes with chocolate and banana, it always used to weird me out, i couldn't get myself to imagine liking that combination (even before trying it).
So when i read this recipe, i thought the best way to know whether i'll like it or not is to try in once and for all..they recipe looked quite appealing and easy, so i went ahead a gave it a try.And i was convinced.I got lovely moist chocolaty muffins, with just a hint of banana flavor, which actually tasted good.
I substituted all of the refined flour for whole wheat and oats, because the moisture from the bananas take care of not making the cake dry. So what you have is yummy chocolaty, whole wheat muffins..

Ingredients:
2 medium bananas (about 1 cup), over-ripe
1 tsp pure vanilla extract
1 large egg
1/2 cup canola oil
1/3 cup + 1 tbsp milk (or sub 2% dairy milk)
2/3 cup granulated sugar
1 tbsp (packed) light brown sugar
2 tbsp unsweetened cocoa powder (look for dutch-processed)
1/2 tsp sea salt
1-1/8 tsp baking soda
1 cup whole wheat flour
2/3 cup ground oats
1/4 cup miniature chocolate chips (bittersweet or semisweet)

Method:
Preheat the oven to 375 degrees.
In a large mixing bowl, use the back of a fork to mash the banana until only very small lumps remain. Add the vanilla and the egg and use the fork to whisk the mixture together until completely combined. Add the oil and milk and stir to combine. Add the sugars and stir again.
Using a spatula, stir in the cocoa powder, scraping down the sides of the bowl as necessary. Mix until the cocoa is completely incorporated. Stir in the salt and baking soda, then gently fold in the flour, until just combined.
Divide the batter among 12 paper-lined muffin cups, about 3/4 full. Sprinkle with the chocolate chips. Bake for 15-17 minutes, rotating once, until the muffin tops look set, and a cake-tester inserted into the center of the muffins comes out clean. Remove from the oven and let cool in the muffin tin for 5 minutes, before removing and cooling completely on a baking rack. Serve warm or at room-temperature.

miniature muffins for little one's tiffin

I know..who would believe these are actually heathy !!!

Thursday, 25 June 2015

Chapati Crisps

Say no to chips no more....

trying to teach your toddler to eat healthy can be quite a challenge..especially in this day and age when every unhealthy snack is packaged especially to attract kids..So it gives me great pleasure when my little one especially requests for these..
the simplest to make and great for the tiffin too...Also a great way to utilize left over rotis..


Ingredients:
2  - 3 rotis cut into triangles or any desired shape..
2 - 3 tsp of oil
a pinch of salt ( try to add as less as possible, so that kids have an early habit of less salt)
oregano
red chilli powder or black pepper powder
garlic powder

Method:
preheat the oven to 160 degrees, grease a flat tray or cookie sheet 1 tsp of oil (you can preheat the tray too for better results)..
mix 2 tsp of oil and all the spices with the cut roti in a bowl. (you can add your own choice of spices).
dump it all in the cookie tray and bake for 10 - 12 minutes..after removing from the oven if some pieces are not yet crisp, keep it in the oven for 3 -4 more minutes (usually doesn't take more than that).
cool completely and serve to ur little one...you could also serve it with a dip to older kids..

Friday, 29 May 2015

victoria sponge

Classic Buttery treat...

I think this would be the oldest and simplest plain butter cake recipe...Its ideal for people who want to start learning the basics of baking, and the end result is a lovely golden yellow buttery sponge cake, that can be layered with jam, nutella, or had just as it is.
This one is an old recipe, dug out of some of my mom's files...oh how i miss that file sometimes.....

layered with chocolate ganache n almonds


Ingredients:
100g butter
100 g powdered sugar
2 eggs
100 g flour
1 tsp baking powder
a pinch of salt
1 tbsp warm water

Method:
cream butter and sugar until it becomes soft and fluffy. Add eggs, one at a time beating well. fold in sifted flour, baking powder and salt, mix lightly and evenly, stir in warm water. Spread mixture evenly in a pan.
bake in a preheated oven at 180 degrees for 20 minutes. until well risen.
serve with jam, chocolate sauce or whipped cream...or just plain doesn't matter it still tastes awesoeme.


layered with coconut cream